
Service Networking for Containers
Overview
In Cloud 66, your services run inside containers. For a service to be available to anything outside its own container, including public internet access, we need a bridge between the container's internal port and an "outside" port.
This is not limited to HTTP or web traffic. The same concepts apply if your container serves non-HTTP traffic (like web sockets, DB containers or custom TCP / UDP traffic).
Port mapping is a small (but important) part of a core system that underpins container management - service networking. If you need an introduction to the concept of Service Networking, you can find one here.
This guide also covers more advanced configurations like using Non-HTTP ports, mapping multiple ports and traffic matching.
In this document, "outside" is used for any client of your service that's not inside the container. This includes your other services on different nodes.
Introduction to mapping container ports
What you'll need
Before you start, please check you have the following:
- A Cloud 66 Account — If you don't already have one, sign up for a Cloud 66 account. Your first server is free, no credit card required.
- An existing containerized application set up — To make the most of this tutorial you need to have an app already set up in Cloud 66. Follow our Getting Started guide if you're not sure how to do this.
This tutorial uses the simple visit counter application we've supplied on Github as a working example.
Mapping container ports
When we set up our demo-app service we configured our ports so that our internal port 5000 was mapped to the public port 80.
Now imagine that your app has evolved to offer secure web (SSL / TLS) access as well as standard web access. TLS traffic typically flows over port 443, so we need to add this to the port mapping for our application.
There are two ways to do this:
- Using the standard edit service interface
- Directly modifying the
service.ymlfor your application (this is only recommended for advanced users)
You can also read our guide to using service.yml for more help.
Editing via the UI
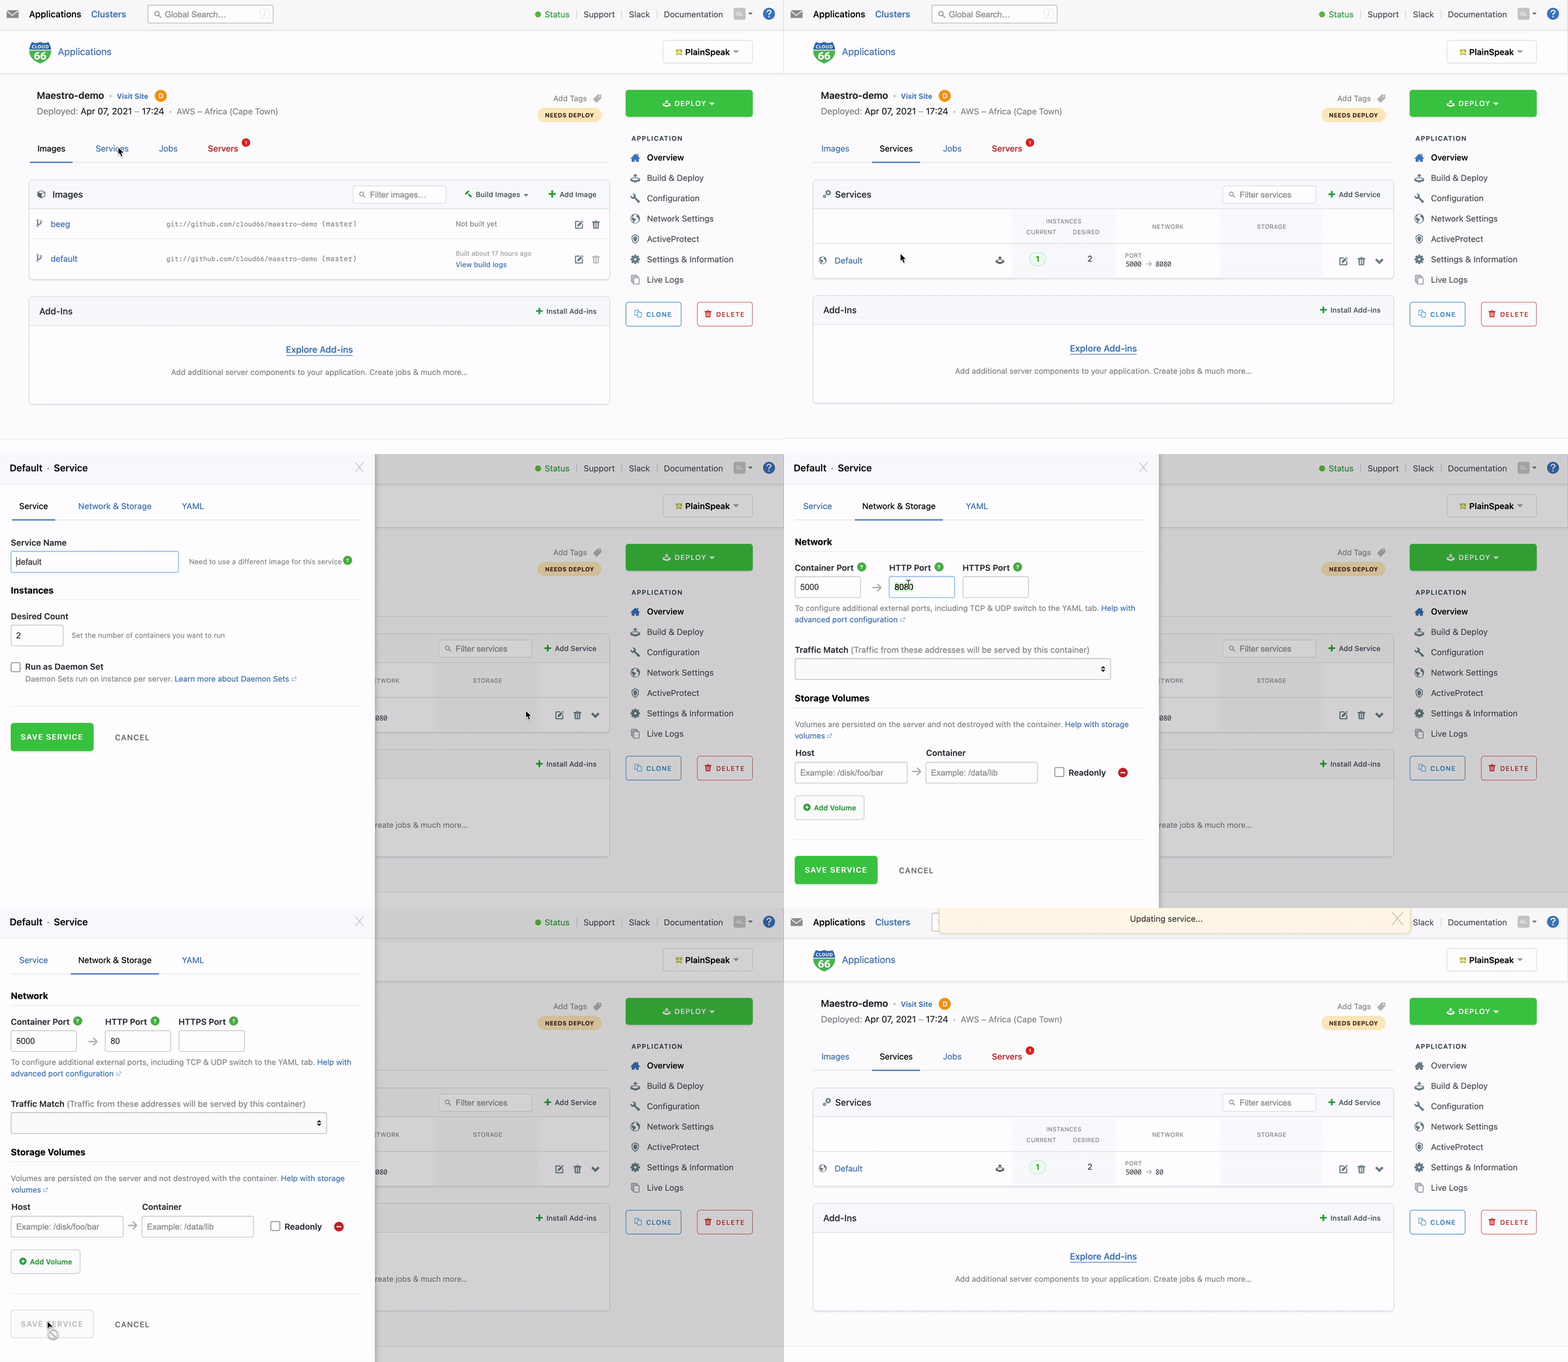
To edit your ports using the standard Cloud 66 user interface:
- Log into your Dashboard and open your application
- Click on Application in the left-hand nav
- In the main Services panel, click on the Edit service icon next to the service you wish to configure. This will open a panel on the left-hand side of your screen.
- Click the Network & Storage tab
- Edit the ports as needed and then click Save Service
Testing your changes
You can test whether this has been properly applied by looking at that the Network column of the Services panel.
If you've followed the steps above correctly, the Network column will list both port 80 and port 443.
In order for these new settings to be rolled out to your service, you must click the green Apply button (above the Services panel) and then redeploy your application by clicking the Deploy button.
If you actually need HTTPS traffic to be available to the outside world (not just as a demo) you will also need to set up SSL certificates for your application.
Editing config files directly
Cloud 66 uses a YAML file called service.yml to define each service inside your application(s). You can edit the content of this file directly using the Dashboard in two ways:
- Via the Services UI, using the left-hand panel we described above - but click the YAML tab instead of Network & Storage
- Via the Configuration Files interface
Note that with method 1 you are only editing the section of service.yml specific to your context. So in this case you would be editing the ports section of your service.yml. To edit the file as a whole, you'll need to use method 2.
Advanced service network configuration
This section covers more complex and advanced cases of service networking for containerized applications. If you've never configured a containerized service before, consider following our tutorial on port mapping first.
If you need an introduction to the concept of Service Networking, you can find one here.
Read our guide to using service.yml for more help on customizing your service configuration.
Non-HTTP ports (TCP and UDP)
If your application does not use HTTP traffic you can map ports by specifying the protocol (TCP or UDP).
Let's imagine we have a service that listens on port 5454 on UDP and we would like to make it available to the outside world on port 111.
To achieve this via the edit service interface:
- Log into your Dashboard and open your application
- Click on Application in the left-hand nav
- In the main Services panel, click on the Edit service icon next to the service you wish to configure. This will open a panel on the left-hand side of your screen.
- Click on the YAML tab in the panel
- Change Container to
5454 - Delete any lines for
HTTPandHTTPS(unless your service needs them) - Add a new line:
udp:111 - Click Save Service
- Apply the change to the service by clicking the green Apply button (above the Services panel)
- Redeploy your application to roll out the change
If you'd prefer to make these changes directly in the (full) service.yml the result would look similar to this:
In the example below, our service listens to TCP port 8787 and we want to make it available on port 9000 to the outside world:
Note that you don't need to set the protocol for the container port - that is defined by the service itself. By specifying the protocol of the HTTP Port you're ensuring that requests that reach the container are using the same networking protocol as the service itself.
Mapping multiple ports
Some services listen to multiple ports. An example is InfluxDB which listens to different ports for queries and admin controls. You can map these relationships using an array in the service.yml. For example:
Examples of default ports
Some example of default ports used by popular programming frameworks or application servers:
| Application | Default Port |
|---|---|
| Rack (webrick) | 3000 |
| Rack (unicorn, thin, puma) | 9292 |
| Node (Express) | 3000 |
| Java (Play) | 9000 |
| RethinkDB | 8080 |
| InfluxDB | 8083, 8086, 8090, 8099 |
| Python (Django) | 8000 |
Traffic matching
Traffic reaches your services through traffic sources - a combination of a domain name and an optional URL path. You manage these from the Traffic page of your cluster rather than in a configuration file.
A traffic source with no path sends every request for that domain to a single service. Adding a path allows several services in the same application to share one domain.
Routing by URL path
For example, you might serve the front end and the API of the same product from separate services:
| Address | Path | Service |
|---|---|---|
example.com | web | |
example.com | /api | api |
Requests to example.com/api, and anything beneath it such as example.com/api/v2/users, are routed to the api service. Every other request for example.com goes to web.
Path matching is segment-exact, so a path of /api matches /api and /api/v2 but does not match /api-internal or /apiary.
The path you match on is stripped from the request before it reaches your service. A service behind /api receives a request for /v2/users rather than /api/v2/users, so it doesn't need to know which path it has been mounted at. Redirects and maintenance mode still see the original URL.
Adding a traffic source
- Log into your Dashboard and open your cluster
- Click Network & Traffic in the left-hand nav and open the Traffic tab
- Click New Traffic Source
- Enter the Domain name, without
http://,https://or a trailing slash - Optionally enter a Path such as
/appor/api/v2. Leave this blank to route all requests for the domain. - Choose the Destination service
- Choose how the SSL certificate for this domain should be issued or supplied
- Click Save
You will also need to point the domain's DNS record at your cluster's load balancer so that traffic can reach it.
Rules and limitations
- Paths require HTTP or HTTPS. A path can only be set on a service that exposes an external HTTP or HTTPS port. TCP and UDP traffic is matched on the domain alone and cannot be routed by path.
- A domain belongs to a single application. All paths on a given domain must point to services within the same application.
- Each domain and path combination must be unique across the cluster.
- Paths must be valid URL paths beginning with
/. They cannot contain spaces, query strings or fragments. Trailing slashes are ignored, so/app/and/appare treated as the same path. - Services created before path routing was introduced are updated automatically the first time you add a path. If a service uses customized templates that predate the feature, update them to the latest version first.
DNS Behaviour
The dns_behaviour directive allows you to change the default behavior of returned DNS addresses of different versions. As outlined above, ElasticDNS always try to return the version of the container that has the same version of the caller. You can change this behavior by setting dns_behaviour value to non-versioned, in which case ElasticDNS will return the address of containers with the latest version.
Load Balancing
You can change the container network load balancing method with the load_balancing directive. The accepted values are roundrobin, sticky and closest, and the default value is roundrobin which return the list of container's IP for the requested service in roundrobin. If you choose the sticky option, you will get the last IP you got (if you request after 1 minute you may get a new IP). If you choose the closest option, you will get the list of container's IP that exists on caller server (it will return all available IPs if there is no container of the requested service on caller server).